
18 February 2012
New address
Hi - just to let you know that this one won't be updated anymore, everything will soon be at - www.chasingtrails.com/blog


3 December 2011
Five Ten Sam Hill Monster Lo MTB Shoes

Time for a review. I've been using these for a couple of months now so thought you might be interested to know how they've been holding up.
I've used Five Tens for the last 5 and a bit years, and believe it or not that's been with the same 2 pairs from the start. When I got the first pair there still seemed some doubt in the air as to whether they'd keep making them. Intense had sold a limited run made by Five Ten beforehand & some downhillers liked them so much they'd bought a few pairs.
I got a pair of the original Impact Low's then thought that if they decided not to carry on producing them it would be good to have a 'spare'... So I ordered a second lot, in the high version. The only real problem I've had in the whole time is when I forgot to dry out a soaked pair & the midsole disintegrated a bit. Arghh! They're still useable but a bit soft. The other pair have been sound until recently when the outer sole split, but five years constant use seemed pretty good. I've not used anything else the whole time.
Back to the new ones - although the standard Impacts seemed supportive enough, the Sam Hill version has a nylon midsole which is a bit stiffer again. This makes them a little better for pedalling efficiency, but lessens the feel a bit. The main reason I went for these was due to the soaking of the older pair. I thought the nylon midsole would be more hardwearing.
I actually prefer the feel of the standard shoes, they seem slightly more 'connected' with the pedals than the Sam Hill version, but it's not a big difference. Compared to any other shoes you might use with flats, any pair of tacky soled Five Tens will seem like a revelation.
The other difference to the standard Impacts is that instead of a wrap-around tongue that's fully attached on one side these have a skate shoe style tongue that has an elastic strap on each side. Again, the standard shoes are maybe slightly more comfy, but this is an even smaller difference.
I have to say I'm happy with them, they're a quality product, but if I'd known in advance I might have gone for another pair of Impacts, just because they're cheaper & there was nothing wrong with them.
I'd say if you've tried the standard shoes & like them you're probably best to stick with them, but if you want slightly more support & maybe straight line speed then give these a try.
I've used Five Tens for the last 5 and a bit years, and believe it or not that's been with the same 2 pairs from the start. When I got the first pair there still seemed some doubt in the air as to whether they'd keep making them. Intense had sold a limited run made by Five Ten beforehand & some downhillers liked them so much they'd bought a few pairs.
I got a pair of the original Impact Low's then thought that if they decided not to carry on producing them it would be good to have a 'spare'... So I ordered a second lot, in the high version. The only real problem I've had in the whole time is when I forgot to dry out a soaked pair & the midsole disintegrated a bit. Arghh! They're still useable but a bit soft. The other pair have been sound until recently when the outer sole split, but five years constant use seemed pretty good. I've not used anything else the whole time.
Back to the new ones - although the standard Impacts seemed supportive enough, the Sam Hill version has a nylon midsole which is a bit stiffer again. This makes them a little better for pedalling efficiency, but lessens the feel a bit. The main reason I went for these was due to the soaking of the older pair. I thought the nylon midsole would be more hardwearing.
I actually prefer the feel of the standard shoes, they seem slightly more 'connected' with the pedals than the Sam Hill version, but it's not a big difference. Compared to any other shoes you might use with flats, any pair of tacky soled Five Tens will seem like a revelation.
The other difference to the standard Impacts is that instead of a wrap-around tongue that's fully attached on one side these have a skate shoe style tongue that has an elastic strap on each side. Again, the standard shoes are maybe slightly more comfy, but this is an even smaller difference.
I have to say I'm happy with them, they're a quality product, but if I'd known in advance I might have gone for another pair of Impacts, just because they're cheaper & there was nothing wrong with them.
I'd say if you've tried the standard shoes & like them you're probably best to stick with them, but if you want slightly more support & maybe straight line speed then give these a try.
28 October 2011
Superstar Nanotech pedals

I've ridden with the trusty DMR V8's & V12's since I switched from SPDs about 5 years ago.
The last lot of V12's expired recently though, and although they might have been fix-able, it was going to cost a good chunk of the new price in parts, so I thought I'd try something else.
I'd have been happy with another lot of DMR's, except for the pesky problem that if/when you get a rock strike the allen grub screws are a bit of a pain to impossible to remove. The new Vaults look good but I wasn't up for the extra cost, so I thought I'd go for some of these Superstar Nanotech thru-pin pedals.
They arrived a couple of weeks ago, but I didn't try them straight away as the forks on the main bike were away on a warranty repair. First ride out though & I couldn't fault them. The nice thin profile meant no catches (I'm sure it'll still happen, but a lot less). The bigger area is handy, or should I make a rubbish pun there & say 'no, I mean footy'. No, thought not...
Anyway, the size gives plenty of support & means you don't have to be pinpoint accurate in your foot placement to feel planted. Shape-wise they seem good, nice & comfy which counts for something near the end of an epic. Pin placement gives good grip, even with not so grippy soles, and great traction with the almost compulsory Five-Tens (look out for a review of the Sam Hill version sometime in the next few weeks)
Apart from that, they've stood up to jumping & the usual rough stuff that the Five encourages.
I'll add a comment if the thru pins don't come out like they should, but as far as I can see the main-steam MTB mag reviews have got it right on these. Great flat pedals & lighter than many. They do magnesium models if you just have to shave off another 100g ish.
1 September 2011
Photo Session
 Did a photo session today with James. Check out his website for some more images of biking & much more. I also particularly like some of the abstract images myself.
The photo opposite is from a previous ride with James on the Moors. Today was at the ace Dalby Forest trails & it looks like there'll be some cool images to come. Great day!
In a way the day seemed opposite to my usual 'work' days, in a good way. Helping you to get your riding sorted involves more than just 1 good attempt at something, so after an explanation & a demo you need to repeat it with maybe a few corrections until everything's working & then a few more times to get it built in to your body memory.
So most days I tend to ride each bit of trail once or twice. Photo sessions, however, tend to involve repetition! I'm always aware of wanting to improve my own skills as well as customers, but I tend to assume it happens riding elsewhere, not Dalby trails I know off by heart. Today though, I was looking to get the line & speed really good on a berm to improve the photo. I ended up varying the line & discovered a subtle tweek was all it took to get a fair bit more speed through the berm.
So I guess the point is that if you already have a skill nailed, the way to make further improvements is to session a small bit of trail until you get the feel for what might improve things. If all it's doing is reinforcing bad habits, then some coaching is probably in order - www.chasingtrails.com/mountain-bike-skills-courses
More of James' photos will appear on the Chasing Trails website over the next few weeks.
8 June 2011
2 really useful wheel building tools
This post is really just a review of a couple of tools rather than a wheel building tutorial!
 Cyclus 720158 Spoke Nipple Driver
You can build wheels without a nipple driver but it's a lot more fiddly & will take longer. Most nipple drivers look like a screwdriver with a bent shaft. That kind is a hand tool & usually costs about the same as, or sometimes less than, the Cyclus one being reviewed, which is about £25. Anyway, I like this particular tool for a few reasons. It's a bit quicker (& less tiring!) to use than a hand tool & the quality seems good. More importantly though, if the spoke lengths you're using aren't exactly precise, the pin is adjustable for depth so you can still get the tensions fairly accurate.
Once you get the feel of using the tool you'll often find that the wheel starts fairly true just from the initial tensioning before you do the final finishing off with the spoke wrench.
So far I've built about 4 or 5 pairs of wheels with this particular tool as well as being used on a couple of wheel building courses. There's been no damage or wear so far despite the fact that nipple drivers work by essentially slipping out of the slot in the nipple when the pin hits the end of the spoke.
So, if you know how to build wheels & you know what a nipple driver does, this one is a good one. That's about it!
 Cyclus (720037) / Sapim Nipple Grip
This one is sold under the Cyclus name as well as Sapim & possibly others. It's less 'essential' than the other on, but it does speed things up & all but prevents the annoyance of a spoke nipple dropping inside the wheel rim. The wire loop just grips the nipple so you can thread it onto the spoke nice & easily. Where it gets more vital is if you're building wheels with deep section rims. It might seem a bit pricey for what it is at £15 or £16, but I'm guessing they don't sell in huge numbers.
Having used one for a good while now I'd not want to be without it. Apart from a bit of extra speed, anything that helps keep a bit of a routine & order to wheel building is a good thing. The wire loops are held in with a grub screw & spares are available, but mine hasn't needed any yet & doesn't show any signs of getting tired.
[edit]...the day after poasting this the body of the tool cracked! Seems like it was a manufacturing fault rather than a design fault. The tool's been around for a while so I'm guessing it's not a common problem[edit]
Spoke keys or wrenches
No need for a full review of these, but if you're after a spoke wrench for workshop type use you really want one that grips the spoke nipples with as much support as possible. Good ones include the Sapim which is my choice. It grips all 4 sides with a diamond arrangement; Park do some good ones but spend the couple of quid more to get the '4 sided' type. The cheaper ones just have a 'u' profile which has more risk of rounding off the nipples; The one by Newton, also sold as Wrench Force is a multi-size design which grips on 4 sides the same as the Park. I also use this, but these days I tend to leave it in my Camelback as the multi-size design means I won't get caught out if someone on a skills course or guided ride needs a wheel sorting.

You can build wheels without a nipple driver but it's a lot more fiddly & will take longer. Most nipple drivers look like a screwdriver with a bent shaft. That kind is a hand tool & usually costs about the same as, or sometimes less than, the Cyclus one being reviewed, which is about £25. Anyway, I like this particular tool for a few reasons. It's a bit quicker (& less tiring!) to use than a hand tool & the quality seems good. More importantly though, if the spoke lengths you're using aren't exactly precise, the pin is adjustable for depth so you can still get the tensions fairly accurate.
Once you get the feel of using the tool you'll often find that the wheel starts fairly true just from the initial tensioning before you do the final finishing off with the spoke wrench.
So far I've built about 4 or 5 pairs of wheels with this particular tool as well as being used on a couple of wheel building courses. There's been no damage or wear so far despite the fact that nipple drivers work by essentially slipping out of the slot in the nipple when the pin hits the end of the spoke.
So, if you know how to build wheels & you know what a nipple driver does, this one is a good one. That's about it!

This one is sold under the Cyclus name as well as Sapim & possibly others. It's less 'essential' than the other on, but it does speed things up & all but prevents the annoyance of a spoke nipple dropping inside the wheel rim. The wire loop just grips the nipple so you can thread it onto the spoke nice & easily. Where it gets more vital is if you're building wheels with deep section rims. It might seem a bit pricey for what it is at £15 or £16, but I'm guessing they don't sell in huge numbers.
Having used one for a good while now I'd not want to be without it. Apart from a bit of extra speed, anything that helps keep a bit of a routine & order to wheel building is a good thing. The wire loops are held in with a grub screw & spares are available, but mine hasn't needed any yet & doesn't show any signs of getting tired.
[edit]...the day after poasting this the body of the tool cracked! Seems like it was a manufacturing fault rather than a design fault. The tool's been around for a while so I'm guessing it's not a common problem[edit]
Spoke keys or wrenches
No need for a full review of these, but if you're after a spoke wrench for workshop type use you really want one that grips the spoke nipples with as much support as possible. Good ones include the Sapim which is my choice. It grips all 4 sides with a diamond arrangement; Park do some good ones but spend the couple of quid more to get the '4 sided' type. The cheaper ones just have a 'u' profile which has more risk of rounding off the nipples; The one by Newton, also sold as Wrench Force is a multi-size design which grips on 4 sides the same as the Park. I also use this, but these days I tend to leave it in my Camelback as the multi-size design means I won't get caught out if someone on a skills course or guided ride needs a wheel sorting.
27 April 2011
Green Oil's Chain Cleaner & White Lube review
As I said a month & a bit ago, White Lube is a wax lube made of naturally produced ingredients. For best results it needs applying to a clean chain (see later). They recommend applying it to the inside of the chain as you wind the pedals backwards, which makes sense as then it gets to the chain rings & cassette as well. Anyway, on to how it does on the trails...
I've been using this for about a month & a half now. As I was hoping, it does indeed keep the chain clean. It picks up hardly any trail mank & grit & the drivetrain stays nice & shiny.
It doesn't need applying every ride, more like every 2 or 3. This is good, as it's easy to use a bit more than needed at first! It's a lot more liquid than you might be expecting, but the solvent (plant ethanol) evaporates off leaving the wax behind. This means you'll want to be careful not to squeeze the bottle too hard & waste a load.
It must be working as everything is quieter than with most lubes. No gritty noises and no squeaking that you get when too thin lubes disappear half way round a ride.
All in all, this is what I'll continue to use. It really is good stuff. The only thing I wonder is if more beeswax could be dissolved in the mix to make the bottles laast even longer, but I'm guessing this has been thought of already.
Green Oil Clean Chain Ecological Degreaser Gel
On to the product. I've used the plastic chain baths with the rotating brushes in the past & they're not bad, but I've always been disappointed that they don't get the chain cleaner than they do. Surprisingly, the 1st time I used the Green Oil gel it easily out-did a chain bath, whatever the cleaning liquid used.
The instructions are easy to follow & not too much of a faff & you don't have to worry about where you use it as it is genuinely bio-degradable. It is actually made from citrus, whereas some of the competitors that have 'citrus' on the label or in the name only use enough to make it smell nice & in fact are made from the usual chemicals. Green Oil's version doesn't have anything to hide & is another great product. It seems to be another case where natural is best in every way. I've not used a better chain cleaner.
Oh and the prices for both of these seem quite reasonable to me. Have a check on the website for up to date prices.
Green Oil is at www.green-oil.net
13 March 2011
Arrived in the post.
Coming up in the next couple of months will be a review of Green Oil's new wax lube. In an odd connection to the last post, this one uses beeswax instead of petrochemicals & plant ethanol as the solvent.
 Green Oil is run by Simon Nash who developed the original Green Oil wet lube whilst at Southampton University. The wet lube does everything that any other wet lube does except that it's made from completely natural ingredients. It's also very reasonably priced.
I've used the wet lube & it's a great product. There's no hint of cutting corners on quality in order to be green, but also no compromises on the green side of things either. It's proof that you can do things well all round if you have the expertise & motivation.
I however prefer wax lubes as I find they need applying less often & the chain attracts less grit & dirt. Si had mentioned back at bikeradar live that there was a wax lube on it's way. So I'm expecting good things from this one.
Before applying wax lube you'll need to clean the chain. Green Oil's Chain cleaner is another quality product. Not sure why I haven't put a review up yet but there will be one witht the results of this test.
Green Oil's site is at www.green-oil.net
Green Oil is run by Simon Nash who developed the original Green Oil wet lube whilst at Southampton University. The wet lube does everything that any other wet lube does except that it's made from completely natural ingredients. It's also very reasonably priced.I've used the wet lube & it's a great product. There's no hint of cutting corners on quality in order to be green, but also no compromises on the green side of things either. It's proof that you can do things well all round if you have the expertise & motivation.
I however prefer wax lubes as I find they need applying less often & the chain attracts less grit & dirt. Si had mentioned back at bikeradar live that there was a wax lube on it's way. So I'm expecting good things from this one.
Before applying wax lube you'll need to clean the chain. Green Oil's Chain cleaner is another quality product. Not sure why I haven't put a review up yet but there will be one witht the results of this test.
Green Oil's site is at www.green-oil.net
18 February 2011
Extra Coast to Coast
As well as the scheduled English off road c2c there's another one running from the 20th - 24th May for Mike Jarmey & 2 mates who're riding to raise money for a couple of bee charities.
 There're plenty of info on the web, but if you didn't know, bees are in decline. This is a problem mainly because of the free work they do. As well as all the honey, bees polinate lots of food crops. It's been worked out that you'd need around 1000 people to do the work of 1 bee.
So it seemed a good idea to help them out a bit with the cost of the trip. They're giving 100% of all donations to 2 bee charities & covering all the costs of the trip themselves. There's some more info & links to the charities on the Mayfield Group's website (of which Mike is a director). You can donate via a PayPal button at the bottom of the page or click here. Using PayPal for donations is another reason they can pass on evrything to the charities. All donations will be much appreciated whatever the amounts & you'll be able to follow the progress of the ride on the Chasing Trails twitter or facebook pages.
There're plenty of info on the web, but if you didn't know, bees are in decline. This is a problem mainly because of the free work they do. As well as all the honey, bees polinate lots of food crops. It's been worked out that you'd need around 1000 people to do the work of 1 bee.So it seemed a good idea to help them out a bit with the cost of the trip. They're giving 100% of all donations to 2 bee charities & covering all the costs of the trip themselves. There's some more info & links to the charities on the Mayfield Group's website (of which Mike is a director). You can donate via a PayPal button at the bottom of the page or click here. Using PayPal for donations is another reason they can pass on evrything to the charities. All donations will be much appreciated whatever the amounts & you'll be able to follow the progress of the ride on the Chasing Trails twitter or facebook pages.
21 January 2011
Superstar 10mm QR Through Axle
You might be wondering what this item is for. It allows you to run a 10mm axle bolt through hub in a frame designed for a standard skinny quick release. Same as a 15 or 20mm axle fork is stiffer than a standard quick release, this gives a stiffer rear end than standard. Normally you'd need a frame with specific dropouts.
This one works like a normal quick release, and unlike a specific 10mm you don't even have to remove it completely to get the wheel out. I ride a 2008 Orange Five, which is great, but I was interested to see whether the rear could be stiffened without paying for a replacement Maxle swingarm.
 If you have a rear hub like a Hope Pro 2, conversion kits are available so you don't have to replace the hub & get the wheel rebuilt. I'm not sure I'd have bothered if the cost was going to be high, but the Superstar QR is £7.99 post free & the Hope 10mm kit was £20.99, so worth a go.
Anyway, the important thing, does it make any difference? Well just had a quick blast & straight away I could tell it all felt more solid. Sidehops normally show up a bit of flex on landing but with the new set up things were much improved.
This should mean holding lines on rough trails will be better, which is the kind of thing I'm after. 90% sure it will based on the 1st ride. If it ends up making no difference I'll add a comment.
This one works like a normal quick release, and unlike a specific 10mm you don't even have to remove it completely to get the wheel out. I ride a 2008 Orange Five, which is great, but I was interested to see whether the rear could be stiffened without paying for a replacement Maxle swingarm.
 If you have a rear hub like a Hope Pro 2, conversion kits are available so you don't have to replace the hub & get the wheel rebuilt. I'm not sure I'd have bothered if the cost was going to be high, but the Superstar QR is £7.99 post free & the Hope 10mm kit was £20.99, so worth a go.
Anyway, the important thing, does it make any difference? Well just had a quick blast & straight away I could tell it all felt more solid. Sidehops normally show up a bit of flex on landing but with the new set up things were much improved.
This should mean holding lines on rough trails will be better, which is the kind of thing I'm after. 90% sure it will based on the 1st ride. If it ends up making no difference I'll add a comment.
19 November 2010
Quick reviews of a load of MTB Kit I've used...
Thought I'd do a list of kit that I've used that works. Hope you find it vagely useful!
Endura Stealth Jacket 07/08 – the first waterproof soft-shell I know of. Great bit of kit, breathes reasonably well even though I sweat almost as soon as I start riding... It's got a thin fleece lining, so I wouldn't wear it on warm days, but the rest of the time it's quite versatile. You can wear it with just a base layer, or if it's really cold with a mid-layer as well. 2 sets of vents make it cool enough as you get warmer. Only a chest & back pocket, but this has been enough for me so far. The back pocket will hold just enough to get by on short rides where you may not want to take a backpack. It's still going strong & still 100% waterproof. Newer versions have more pockets, so even better. Only regret is that I went for red instead of my usual preference for dependable black! The blue looked quite good but wasn't in stock at the time
Endura Venturi eVent jacket & trousers – eVent seems to live up to the hype. The theory is that it breathes without body heat. It's as or more breathable than most other materials, but feels better than some when you get a bit cold. Also seems reasonably tough & hard wearing. I recently did put a small tear in the knee, but this was a heavy fall with a huge pack on ...gaffer tape required! Well thought out, 2 side pockets plus a back pocket. Still waterproof after 2½ years & has only been re-treated 'just in case'.
Comments for the jacket as for the trousers. It has more pockets than the Stealth. Great jacket, shame I stupidly lost it...
- Paramo Velez Adventure Lite Smock – got this to kind of replace the eVent jacket. This is the first Paramo that isn't too hot for biking in. I thought I'd try it as Paramo stuff lasts ages; many people have Paramo gear that's been going for over 10 years.
Reason for this is that the waterproofing is down to a layering system rather than a membrane. If it loses it's waterproofing a bit you just re-proof with Nikwax TX10 to bring back the performance. The smock design might not suit everyone, and there is only a chest pocket & a kind of one piece hand-warmer pocket accessed through the side vents, but I always have plenty of space somewhere, so lack of pockets hasn't been an issue for me. It's still a warmish garment for cycling, so can be worn with just a base-layer, but if it gets too hot the afore-mentioned side-vents allow for a fair bit of cooling. Not really for the summer, but the rest of the year it's great. First impressions were that the sleeves were on the short side for biking, but in practice this hasn't been a problem. The Velcro cuffs seem to do a good job. The other difference with Paramo is the feel, their stuff is really soft to wear
5-10 Impact High/Low '06 – most people know how good 5-10 shoes are. They use tacky rubber, same as climbing shoes on the soles, so they grip flat pedals like nothing else. Only thing to add is that they're still going now with no signs of giving up. The newer ones are synthetic uppers, not heard any negatives about this so far. The main reason why I have 2 pairs is that at the time there seemed to be some doubt as to whether they would keep making them, so I ordered a second lot. They proved so popular that it looks likely they'll be made for some time into the future. The Lows are a bit more comfy, I have weird feet with angular bony bits that make the left shoe slightly less comfy on the High's. I found the High's could be waterproofed reasonably well with Grangers or similar.
If they do get wet, dry them out fairly soon, as almost every shoe other than the clip-in types have a midsole made of compressed & glued cardboard, or something similar
howies merino base layers – many reasons why I use these; they're still reasonably warm if they get wet, they breathe better than anything else by a long way, they never smell bad like synthetics, they keep you warm in the winter & cool in the summer. The merino fibres are naturally resistant to bacteria & they can absorb a lot of liquid before they feel damp. howies merino is about as good as it gets, so there's no hint of itchiness
- howies merino mid layer – same comments as for the base-layers, just a warmer version. They have thumb loops to make it easier to put a jacket on
- howies long way home shorts & merino liner – not much to say, the shorts are comfy, the liners are really comfy. It looks very much like they were made by Endura, which is a good thing, but they were quite pricey. Bit of an irrelevant review as they don't seem to sell them any more. They do have a habit of reviving stuff though...
- Endura Humvee & Singletrack shorts – really well made, Endura stuff generally is. They have plenty of pockets & the Singletrack shorts came with liners. Most shorts do the job, but Endura seem to do it pretty well. Best to try on before you buy, as good fit is important
Rixen Kaul Klickfix Mini Map Holder – the Klickfix system is used to attach various things to the handlebars, but the map holder is the only thing of interest to me. The map holder is great, helps avoid missing a turning because you have the map in sight all the time. It's made of folded perspex & is A6 size. I use Memory Map & then laminate the maps. Satmap seem to have borrowed the same attachment system for their GPS unit. The mount rotates 90 degrees to fit bars or stems. The similar Polaris MapTrap is a bit cheaper & has an identical looking map holder. Not sure if it's as versatile in fitting though. I reckon I'd struggle to fit it around a bike computer & light as easily as with the Rixen Kaul version
Middleburn chain rings & RS7 cranks – lightweight cranks with a lifetime guarantee! The RS7's are guaranteed for dirt jumping & DH! If you want to go even lighter they do the RS8. Still guaranteed, but not for jumping & downhill. Mine are ISIS, they also do square tapered & were working on an x-type. Many will be put off by ISIS bottom brackets, as there have been some bad ones. In my experience the good ones outlast external BB's by a fair bit. Current one is a Superstar, it's made like the old Shimano square taper cartridge BB's, which is a good thing. See the long term review earlier in the year for more. Still going strong with a reasonable amount of air-time... The chain rings are made of the better 7075T6 alloy. You get a choice of clear, coloured anodised finishes or a hardcoat, as well as the choice of slickshift or not (shifting pins & ramps). Much discussion can be found on forums about whether the hardcoat does anything, but in my experience it does seem to substantially increase the lifetime. If you're running a single ring then there's no need for slickshift so you'll save a little bit. You'll find other makes that do 7075T6 chain rings, some cheaper, some more expensive. Watch out for the quality of machining as well, as the more accurate the tooth profile the longer they'll last
- KMC X9 chains – KMC also make Shimano's chains as far as I'm aware. They're by far my chain of choice. If you join them with the powerlink as per instructions they seem super tough. Spare Powerlinks are available from sellers for easy repairs on the trails, although I've never had one break. With the standard X9 it doesn't matter whether you go for the grey(73), grey/silver(93) or silver(99). I checked with KMC & they're all the same quality/strength, so I go for the cheaper grey X9-73 model. By all accounts the lightweight versions aren't so tough, but this is the same with all brands. Hollow pins & cut-out side plates might look cool & save a few grams, but they will break more easily...
- XTR M952 rear mech – it finally gave up recently, the springs were really weak & chainsuck was occuring on the granny ring despite everything being new! It was no longer providing enough tension. But it gave about 5 or 6 years of heavy use, and I bought it 2nd hand from ebay for about £25. It looked a few years old even then!
- XT Shadow rear mech – the replacement for the XTR. Works really well, even lighter but also more positive shifting & the cable routing on the Orange Five is much improved. Nothing badly wrong with it before, but it's much more direct & stops the outer cable from moving back & fore in the guides
- Sealskinz socks – fully waterproof socks with a seal around them so they stay waterproof even when fully submersed. Still going strong after about 6 years, although they've not been used all the time. Mine don't have a warm lining, so I use them with some thin merino socks which make them plenty warm enough. A practical point with gloves & socks is to put them on in the warm! Change in the cold & you'll stay cold...
- DMR V12's – these seem to fit my feet nicely. The bearings/bushings seem to last ages, I've never needed to replace them. Practical tip; to grease them, remove the alloy end cap, clean the old grease out if it's dirty then fill the cavity & the cap with clean grease & re-fit. Repeat until the dirty stuff is pushed out at the crank end of the axle & you start to see a bit of clean stuff coming out. Downside with V12 type pedals is when you mash a pin on a rock & destroy the hex fitting the pins have a tendency to crumble when the necessary mole grips are used. Not always, but sometimes. This can make them impossible to get out. The pins seem that hard they break ti coated drills. So if you see any signs of damage replace them before it's too late. Problem is you don't always see it coming
- Fox Flux lid 08 – good coverage, good venting, seems solid, fits me well. Try before you buy for fit, as it's no good a helmet being great on paper if it's not comfy
- BBB replacement derailleur jockey wheels – cartridge bearings & fibre-glass reinforced plastic, last longer than XTR originals & are about ¼ of the price. I've used them for ages with no complaints. The upper one doesn't float like the Shimano originals, but seems to make hardly any difference. Possibly slightly more positive shifts but almost impossible to tell
9 November 2010
Coming soon...
Still haven't got round to actually writing up some proper reviews, but in the mean time, here's a list of what you can expect for the next post, which will hopefully be in a week or so:
It'll get written up when I get back from doing a coast to coast ride.
- Endura Stealth Jacket 08
- Endura eVent trousers
- Endura eVent jacket
- Paramo Velez Adventure Lite Smock
- 5-10 high '06
- 5-10 low '06
- lots of howies merino base layers
- howies merino mid layer
- howies long way home shorts & liner
- Rixen Kaul Klickfix Mini Map Holder
- Middleburn chainrings & RS7 cranks
- KMC X9 chains
- XTR M952 rear mech
- Sealskinz socks
- DMR V12's
- Fox Flux lid 08
- BBB jockey wheels
- Superstar ISIS BB
It'll get written up when I get back from doing a coast to coast ride.
7 October 2010
No posts for a while...
Just looked at the date on the last post & realized I've been quiet for a while.
In case you thought I'd permanently fallen asleep or something, there will be another one up soon. The next one will hopefully be useful, it'll be a kit list with why I own the items I own & how it's all performed over the time.
Some will be specifically bike kit, some bike relevant but useful for other sports as well.
Hopefully will be up within the next couple of weeks.
Happy riding...
In case you thought I'd permanently fallen asleep or something, there will be another one up soon. The next one will hopefully be useful, it'll be a kit list with why I own the items I own & how it's all performed over the time.
Some will be specifically bike kit, some bike relevant but useful for other sports as well.
Hopefully will be up within the next couple of weeks.
Happy riding...
17 August 2010
Satmap Active10 - final thoughts
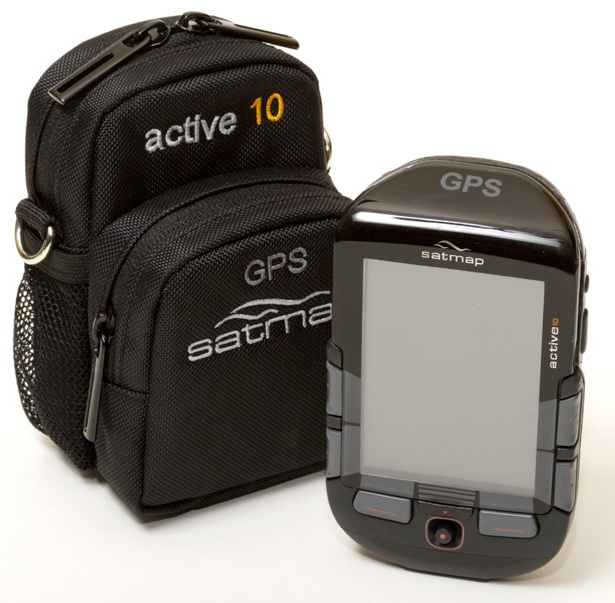
So, it's a bit late, but I thought I'd better finish off the review.
Positives first:
- Ease of plotting a route. For mountain bikers a big selling point is the ability to go out & explore, then plot a route back home from wherever you happen to be. This is great for MTBers as you can cover more ground on a bike & exploring will get you 'lost' more quickly than on foot.
- Many people like to use a GPS to log their progress which the Satmap seems to do accurately. If you want a GPS for this purpose you might find the other features unnecessary, but you might become convinced by the value of the map display
- A major plus for bikers is the replaceable screen cover. There's a fair bit of peace of mind knowing that if it gets scratched a replacement is cheap & available. I only used the unit in the dry, but someone who owns a unit told me that in the wet, moisture gets behind the cover making the display harder to read, so maybe some better sealing might be needed?
- The unit has a tough feel to it which is big plus for MTBers.
- The main negative I found is the battery level display. It shows as maximum for ages, but when the batteries run out there's very little warning. Another owner I met mentioned the same problem. The batteries supplied gave about 2 days worth, but they were the expensive Lithium type, so to use these regularly would be quite expensive. I guess this wouldn't concern everyone. A rechargeable is available and comes as standard if you buy the MTB kit. If however the unit's being used for expedition type journeys then there might not be chance to recharge. It may well be good in comparison to other units, but more battery life is always a good improvement.
- As far as I know the screen on the unit is good in comparison to others, but I found the display very difficult to read in sunlight. I'm guessing this is the case with most GPS units, but one of Satmap's selling points was that it was easy to read in sunlight. It's a bit of a pain needing to find shade in order to see the display, and sometimes that means that a map in a map holder is faster to use.
- Sometimes the map didn't orientate correctly which meant if I was relying on the unit it caused wrong turns. This happened mainly on just one route, others were OK. The three of us on the ride thought that using the unit had lengthened the journey time a fair bit over using an OS map.
- I didn't find the menu system that intuitive. I got used to it, but I'm quite good with gadgets and often don't need instruction manuals, but I had to keep referring back to the manual for a lot longer than usual.
- Most MTBers will ride with gloves all year round, and usually full fingered ones. The buttons are a bit awkward to use with gloves. I thought they lacked feel without gloves & even thin gloves made it worse. A light-ish touch combined with a more definite click to the buttons would be ideal I think. This isn't a major gripe though.
- Another minor was the bulk of the unit. It would be nice if any future versions were smaller or thinner. Crashes are inevitable at some point when mountain biking, and it's not always possible to mount the unit in a way that would avoid damage in a fall. For some bikes maybe putting it on the top tube would work, but if the frame tubes are fatter the unit ends up being too far back & the rider's knees would hit it.
If you're after a GPS with OS Maps I'd say this is a good one to go for, some of the other similar models from other brands have some major disadvantages like no option to change batteries so if the rechargeable one runs out you're stuck, or just generally dissatisfied owner reviews on the net.
23 July 2010
KMC X9 Chains
This is a long term review proper, just to let you know my chain of choice. It's a kind of vital component! There's basically 3 main makes available, Shimano, SRAM & KMC. As far as I know, KMC make the Shimano chains, which is curious, because in my experience, Shimano are excellent at almost everything, with the possible exception of their chains. KMC however, make some absolute bullet proof offerings under their own name. The X9 series (if you ignore the drilled out lightweight ones)are all the same apart from the colour. They do a grey, a silver/grey & a silver, for slightly different prices. You can pick them up for a huge amount less than the equivalent Shimano or SRAM chains and although it's not easy to judge, they seem to me to outlast the other makes. I've never managed to break one and they seem to wear better.
That's it really, just 4 years worth of use & they've never let me down. There's no sponsorship involved (although I'd be fine if they're interested!), just an honest account of a few years of use.
28 June 2010
New Course - Friday afternoon air...

So if you're one of them and fancy learning to get air safely, knowing you can stay in control & get the landing right, sign up for a course.
We've had great success teaching jumps on the regular courses, so thought it would be good to offer it to people who don't necessarily need to learn other skills.
Next one's on the 10th Sept, but as usual if you have a group together already you can contact us for a time that suits.
See the prices & dates page to book, or contact us to pay by bank transfer or cheque. Feel free to phone for a chat if you have any questions.
5 June 2010
Satmap Active10 - update
Got one of these through the post end of April by Special Delivery from the UK distributors. They were after feedback about the unit from a mountain biker's point of view. There'll be a full review after it goes back at the end of June, but here's a few comments:
Battery power seems to be easily good for a day & a bit - so far hasn't lasted 2 whole days with high capacity alkalines. If I owned the unit I'd go for the rechargeable battery (you can always keep AA's as backup).
As with any device with a backlit LCD screen, the brighter the default setting the shorter the battery life. Also the longer the screen stays on before sleep the more battery drain ...obvious to some, not so obvious to others. So far I've left the screen on a mid setting & about 30 seconds until the screen switches off. In bright sunlight the map is quite hard to read, but the waypoint pointer is much easier. As far as I can gather this is the same with all brands.
One thing I need to have a play with is the speed setting at which the compass switches modes. Sometimes at slow speeds, like on a steeper climb, the map flips 180 degrees or the waypoint goes a bit random. This can be a bit of a pain sometimes & send you the wrong way, but not for long. Still annoying though if you end up having to double back & it's uphill... I have a feeling that altering the afore-mentioned mode change speed might sort this.
To me the unit is more useful as a get you home device if I want to explore randomly then switch the unit on to plot a route back. The route maker is easy to use & by all accounts the Satmap is the only unit with a decent one.
For a pre-planned route I prefer to use a traditional map. If you can already read maps then why get rusty? Plus there's no batteries to run out & nothing to malfunction (although the Satmap10 is a reliable unit).
That's all for now, more later.
27 April 2010
Satmap Active10
Just received one of these through the post by Special Delivery this morning from the UK distributors. They were after feedback about the unit from a mountain biker's point of view. I've only had a quick look so far as I'm waiting for a map-card to show up. First impressions in no particular order:
Like
- Replaceable screen covers
- Easy to plot routes on the unit
- ...which allows it to be used without a PC
- Personally I like the button control as opposed to touch screen
- OS mapping
- Really solid bike mount
- Decent carry case
- Appears to have good battery life, will report more fully later on
- so far, not much except the buttons need a firm press
13 April 2010
Singletrack World » Dig For a Pig
Singletrack World » Dig For a Pig
Click the link for info on winning a Ragley Blue Pig in exchange for some trail maintenance with SingletrAction

Click the link for info on winning a Ragley Blue Pig in exchange for some trail maintenance with SingletrAction

Find out more about SingletrAction and other upcoming dig days on their site.
8 April 2010
English coast to coast trip
 Just a quick post to let you know about the latest trip on offer. The English off-road c2c is a one of those 'must do' trips for mountain bikers, but there are a good few routes you could use. You won't find this exact route in the guide-books; the trails have been carefully chosen to replace some that have been dulled down with trails that give you the MTBers grin!
The trip is fully supported meaning you'll only only need to carry provisions for the day's riding (do I hear cries of cake, Haribo & chocolate?)
It's possible to do the route in 3 days, but we're taking 5, as we reckon real mountain biking is as much about enjoying the trails & the surroundings as eating up the miles. You'll need to be OK with about 35 miles per day, mostly off-road. The route goes west to east, from St Bees to Robin Hoods Bay, and accommodation along the way will be a combination of B&Bs, pubs and better quality bunkhouses. You'll only need to find your own evening meals
More details here - chasingtrails.com
Cyclist No.1
 Cyclist No.1 is a new not-for-profit cycling website that's already taking off in a big way
Gary Lake is the editor & designer. His career in digital media shows up in the high standard of the site. There's already a strong team of regular contributors including Phil Saxena the world-class trail builder, Rob Lee who's a top UK endurance racer and lately, me as the MTB Technique contributor
There'll be a short bio up there in the next few days, but the 1st in a series of articles is already up. It's on the basics of braking. More will follow at aprox 1 per month(ish) depending on how busy life is
You can also find Cyclist No1 on Facebook and twitter
Subscribe to:
Posts (Atom)
